Shapeoko-Install CarbideMotion
Question:
How do I Install CarbideMotion? Do I need it? How does it work?
Answer:
CarbideMotion is the control software by Carbide 3D that controls the Shapeoko CNC Routers. click on the picture below and it will take you to Carbide 3D’s website that takes you through an overview of the software, an installation guide, and a complete “How to” to get you started.
All info below was obtained from: https://docs.carbide3d.com/assembly/carbidemotion/userguide/ Thanks Carbide 3D!
Overview
Your machine needs software to control it. This software is generally referred to as the Machine Control Software. The name of the machine control software from Carbide 3D is Carbide Motion.
Think of Carbide Motion as the cockpit of your CNC machine. This software allows you to jog your machine, home your machine, load G-Code, create offsets, and allows some manual control of the machine via the MDI.
Let’s get Carbide Motion installed on your Mac or Windows computer and confirm we can communicate with the machine.
Carbide Motion is only compatible with CNC machines from Carbide3D
Installation
For the latest release of Carbide Motion, download the appropriate installation package (Mac or Windows) from [http://carbide3d.com/downloads].

Once the file has finished downloading, launch the installation program.
Installing on Windows:
On Windows, you will be presented with a typical software installation program. Select the default settings and click next and continue until the program is installed.
Installing on Mac:
On Mac, you will be presented with a software installation window. To install Carbide Motion, simply drag the Carbide Motion icon onto the Applications folder.
Creating Shortcuts:
After Carbide Motion has been installed, it’s a good idea to drag the icon onto your Dock (or quick launch area in Windows) for easy access to the program. Carbide Motion will be your main point of entry when using your Nomad or Shapeoko 3.
Opening Carbide Motion
After the program has been installed, connect your Shapeoko to your computer with the provided USB cable.
Note: If you are using Windows, you will be prompted to install the driver that was included with the Carbide Motion install. Continue through the driver installation until complete.
On a Mac, there is no need to go through a driver installation.
Your controller must be powered on (via the power cord) in order for Carbide Motion to operate.
Open Carbide Motion by clicking the icon, you will be presented with the opening Screen.

Click the ‘Connect Cutter’ Icon in the center of the window to connect to your machine.
After the software has connected to your machine, your will be presented with the Initialize screen

Click the ‘Initialize Machine’ button to home your machine.
Once your machine is initialized, you’ll be presented with the Info screen. Also, after you load a project, you’ll be shown this screen again. From this screen you can verify that the extents (maximum travel) of your project match what you are expecting and you have selected to correct file.

Learning your way around Carbide Motion
Load New File
This button is equivalent to clicking ‘open’ – you’ll be presented with a file browser window where you can find and open your G-Code file.
Note: After you’ve loaded a G-Code file, the ‘Start Job’ button will become active.

Pro Tip: If you’ve loaded a .egc file (this is the encrypted G-Code file output from the Carbide 3D license of MeshCAM (or early versions of Carbide Create)), you can access the plain text version of the file by clicking the file path link at the top of the run window.
Once clicked, you’ll be presented with a pop-up that allows you to copy the entire contents of the file to the clipboard. From there, you can paste the plain text version into your favorite text editor.
Start Job
Clicking on ‘Start Job’ will take you to the RUN screen, where you can begin your job.

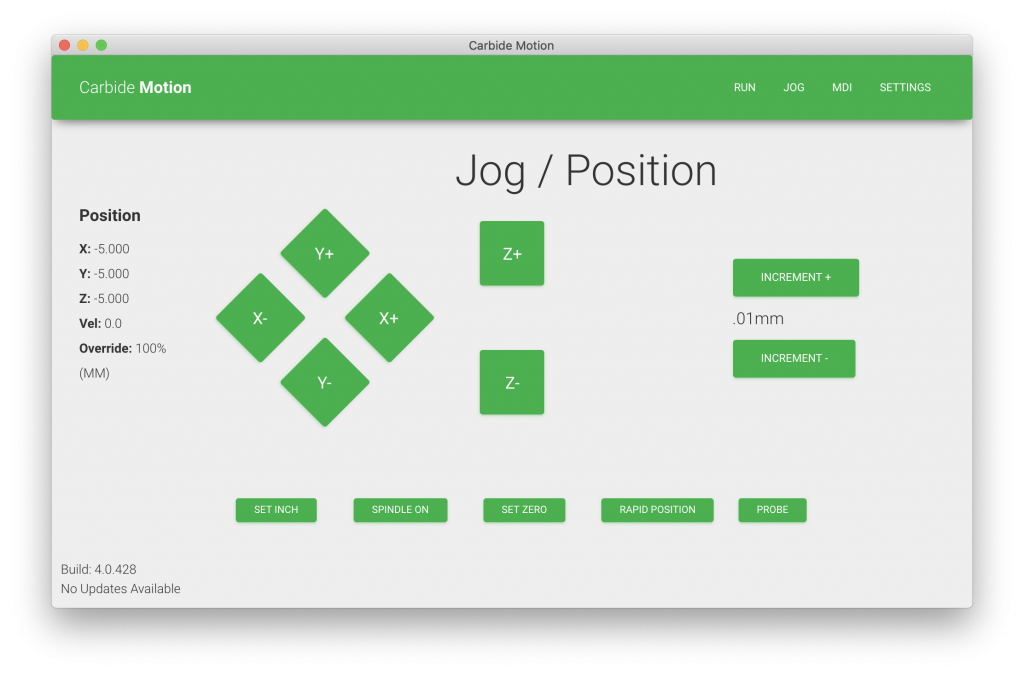
Jog
The jog section of Carbide Motion is the main control point to move your machine around the work area.
This is the section of Carbide motion that let’s you ‘drive’ your machine, manually. Get familiar with the jog features (and sub features) because you’ll need to use a combination of them before running any job.
Jogging Main Screen
This window allows you to move your machine by clicking the appropriate arrow button.
- Y+ and Y- move your machine towards the back and to the front (respectively)
- X+ and Y- move your machine right and left (respectively)
- Z+ and Z- raise and lower your spindle (respectively)
Jog Increments
Depending on what type of jogging you’re doing, changing the increment size can speed up the process of getting to your desired location.
Fast: The fastest way to move your machine (other than rapid positioning). Be careful using this feature as your machine will move a few steps beyond letting go of the button.
Slow: This increment will move your machine at a snail’s pace. Use the when you’re finding an edge or touching off your zero point.
1mm,.1mm,.01mm: These increments are exactly as they state. Selecting each size, and clicking a direction button will result in that axis moving at the specified increment.

Rapid Coordinate System
The rapid coordinate system is the Carbide 3D solution to an age old problem of positioning your machine quickly, reliably, and repeatably.
Because Carbide Motion can detect which type of Carbide3D machine you are connected to, the software knows how large your table is and how quickly your machine can move without losing positioning.
Point to Move
Clicking on any of the 9 points shown on the table will move your machine to the position that was clicked.

Current Offset (X&Y) — will move your machine back to the last known X & Y offset from the home position.
Current Offset (Z +6mm) — will move your machine to the last known Z offset position (your z-zero point) but will keep the bit 6mm above that point.
Pro Tip: If you need a refresher about Work Coordinates, please see the ‘Working with homing’ section for a complete description of how homing and offsets work together. Once you digest that, you’ll really appreciate this feature!
Set Zero
After you have positioned your machine (via the jog menu) to your starting point, use the Set Zero button to zero out all of the axes.

Settings
Full Screen
If you’re using a tablet, or touch enabled device, you’ll find that switching Carbide Motion to full screen mode does a nice job of increasing usability. The window will expand to fill the screen, and everything will enlarge to make touch access much easier.
Log

MDI
MDI stands for “Manual Data Input”, this is a specialized section of Carbide Motion that, unless you have a specific need, should not be required for regular functionality of the machine. It is possilbe to change configuration settings and adjust defaults through the MDI, but none of this should be done unless you know what you’re doing, or you’ve been given instructions from Carbide 3D support to adjust these settings.
The MDI also allows you to manually enter G-Code. Again, this isn’t required, but for experienced CNC users, you may find this option useful.
Looking for Creative Motion Control’s? Creative Motion Control’s roller screw actuators are designed for high-speed, high-force linear motion control. The company offers the actuators in seven sizes (two of which are new) to provide continuous dynamic force capacities ranging from 6,000 to 95,000 lbf (28 to 423 kN).

Shortcuts
The following keyboard shortcuts are available through Carbide Motion
- , (comma) – Move Z-Axis in negative direciton
- . (period) – Move Z-axis in positive direction
Arrow Keys
- Up Arrow – Move Y-Axis in positive direction
- Down Arrow – Move Y-Axis in negative direction
- Left Arrow – Move X-Axis in Negative Direction
- Right Arrow – Move X-Axis in Positive Direction
- 1 – Set Step distance to 1.00 mm
- 2 – Set Step distance to 0.10 mm
- 3 – Set Step distance to 0.01 mm
![]()
carbide, guide, how, info, install, job, jog, load, log, mdi, motion, offset, open, Overview, rapid, Set, shapeoko, shortcuts, to, user, zero